> ## Documentation Index
> Fetch the complete documentation index at: https://docs-staging-actions-triggers-prototype.mintlify.site/llms.txt
> Use this file to discover all available pages before exploring further.
> Learn how to configure and use the Auth0 Authentication API Debugger extension.
# Authentication API Debugger Extension
The Authentication API Debugger extension allows you to test various endpoints of the Auth0 Authentication API.
## Install the extension
To install this extension:
1. Navigate to [Auth0 Dashboard > Extensions](https://manage.auth0.com/#/extensions), and select **Auth0 Authentication API Debugger**. The **Install Extension** window opens.
2. Select **Install**.
## Authorize the extension
Because the extension will communicate with the Management API on your behalf to retrieve details about the Applications you have configured in your Auth0 Dashboard, you will need to authorize its access.
To authorize the extension:
1. If you're following this guide, you should already be on the [Installed Extensions](https://manage.auth0.com/#/extensions) view of [Auth0 Dashboard > Extensions](https://manage.auth0.com/#/extensions). Select **Auth0 Authentication API Debugger** to launch the extension. A consent dialog will appear, requesting access to your account.
2. Consent to allow the extension to access your account. After you consent, the extension launches.
## Configure the extension
After the extension is installed, you should apply the basic configuration. To configure the extension:
1. If you're following this guide, you should already have launched the extension. Select the **Configuration** view.
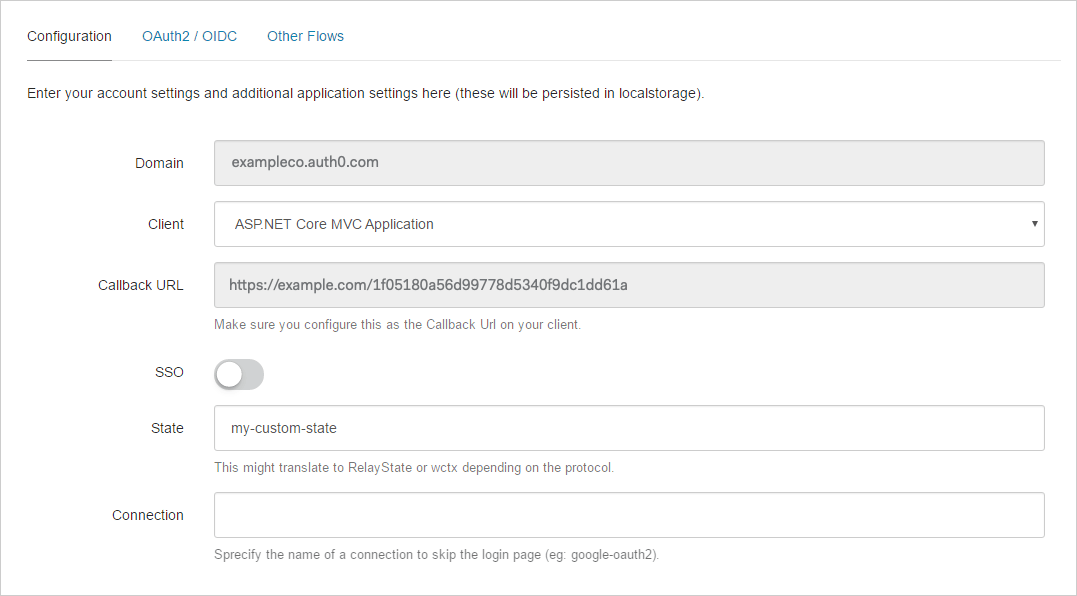 2. Set the following configuration parameters, and select **Save**:
* **Domain**: The domain for your tenant. This field is read-only and is displayed for informational purposes.
* **Application**: The Application for which you want to initiate any authentication flows. You can manage your Applications at [Auth0 Dashboard > Applications > Applications](https://manage.auth0.com/#/applications).
* **Callback URL**: The callback URL for this extension. You must also add this URL to the **Allowed Callback URLs** in the selected Application's settings.
* **State**: Optional state information that can be sent with the authentication flow.
* **Connection**: The name of the connection with which you want to log in. You can use this parameter to bypass the main login screen and go directly for the login screen of the relevant Identity Provider.
## Execute the flows
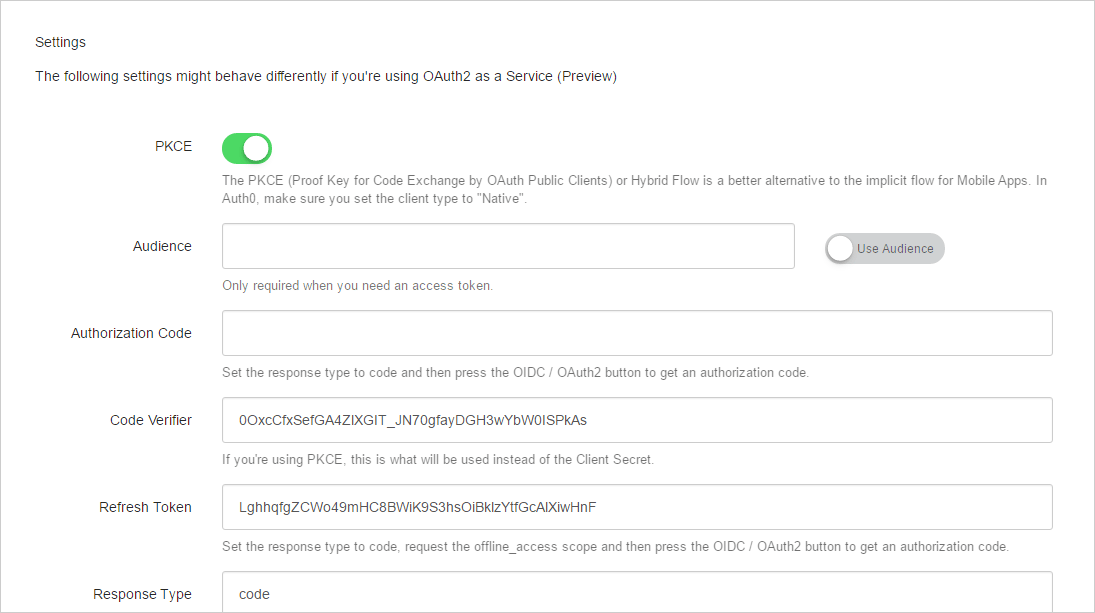
After configuring the extension, you can execute any of the flows by selecting the **OAuth2/OIDC** view.
For some of the flows, you may need to specify more settings than those applied for the basic configuration. These settings will depend on which flow is being executed, so we suggest that you see the [Auth0 Authentication API documentation](/docs/api) to learn more about the applicable parameters for each flow.
2. Set the following configuration parameters, and select **Save**:
* **Domain**: The domain for your tenant. This field is read-only and is displayed for informational purposes.
* **Application**: The Application for which you want to initiate any authentication flows. You can manage your Applications at [Auth0 Dashboard > Applications > Applications](https://manage.auth0.com/#/applications).
* **Callback URL**: The callback URL for this extension. You must also add this URL to the **Allowed Callback URLs** in the selected Application's settings.
* **State**: Optional state information that can be sent with the authentication flow.
* **Connection**: The name of the connection with which you want to log in. You can use this parameter to bypass the main login screen and go directly for the login screen of the relevant Identity Provider.
## Execute the flows
After configuring the extension, you can execute any of the flows by selecting the **OAuth2/OIDC** view.
For some of the flows, you may need to specify more settings than those applied for the basic configuration. These settings will depend on which flow is being executed, so we suggest that you see the [Auth0 Authentication API documentation](/docs/api) to learn more about the applicable parameters for each flow.
 Once you have executed a particular flow, you will see a screen that displays the information returned from Auth0. The exact information returned will depend on which flow was executed. An example of the results after executing a normal **OAuth2/OIDC Login** flow is as follows:
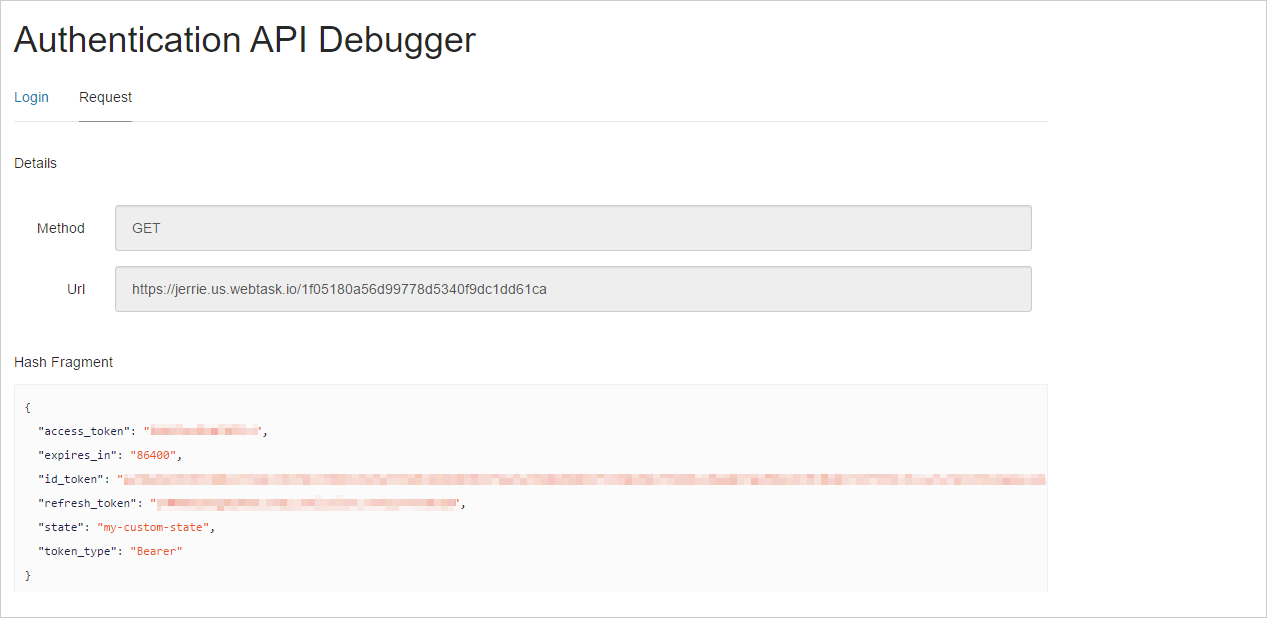 To execute another flow, select the **Login** view to return to the **Configuration** screen.